2-Node Virtual SAN Software Defined Self Healing

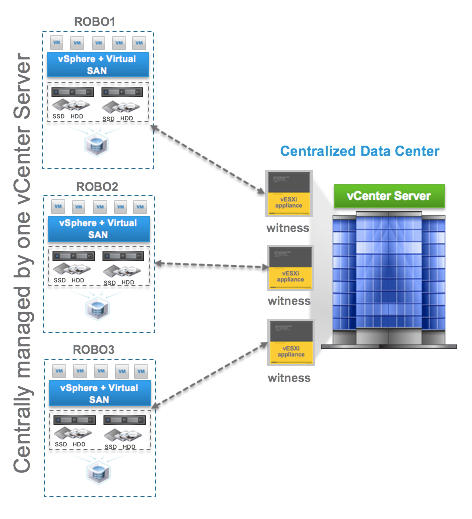
I continue to think one of the hidden gem features of VMware Virtual SAN (VSAN) is its software defined self healing ability.  I recently received a request for a description of 2-Node self healing. I wrote about our self healing capabilities for 3-Node, 4-Node and more here. And I wrote about Virtual SAN 6 Rack Awareness Software Defined Self Healing with Failure Domains here. I suggest you check out both before reading the rest of this. I also suggest you check out these two posts on 2-Node VSAN for a description on how they work here and are licensed here.

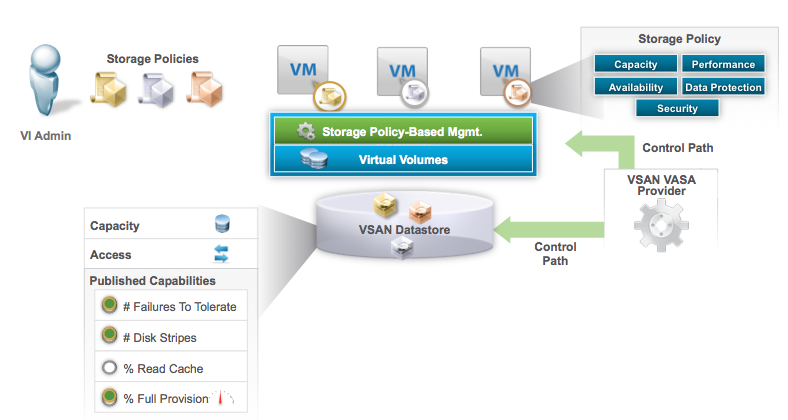
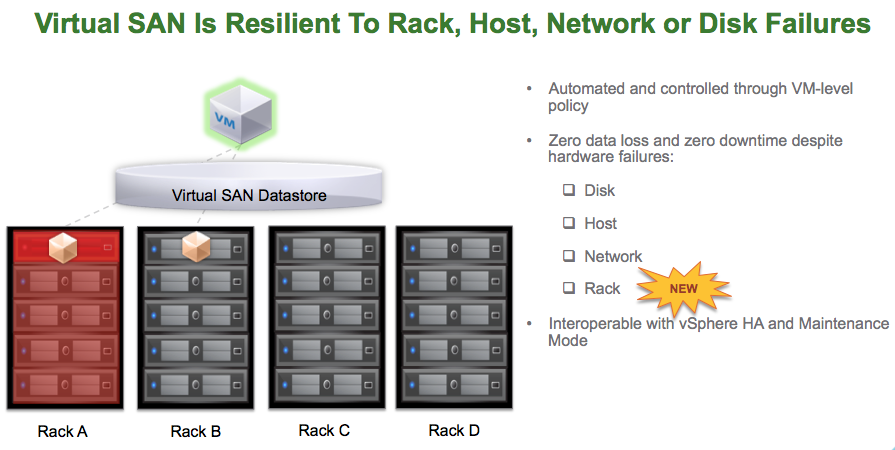
For VSAN, protection levels can be defined through VMware’s Storage Policy Based Management (SPBM) which is built into vSphere and managed through vCenter.  VM objects can be assigned to different policy which dictates the protection level they receive on VSAN. With a 2-Node Virtual SAN there is only one option for protection, which is the default # Failures To Tolerate (#FTT) equal to 1 using RAID1 mirroring. In other words, each VM will write to both hosts, if one fails, the data exists on the other host and is accessible as long as the VSAN Witness VM is available.

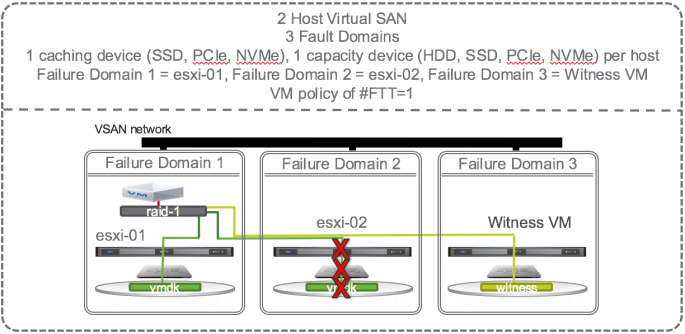
Now that we support 2-Node VSAN, the smallest VSAN configuration possible is 2 physical nodes with 1 caching device (SSD, PCIe, or NVMe) and 1 capacity device (HDD, SSD, PCIe, or NVMe) each and one virtual node (VSAN Witness VM) to hold all the witness components. Let’s focus on a single VM with the default # Failures To Tolerate (#FTT) equal to 1.  A VM has at least 3 objects (namespace, swap, vmdk).  Each object has at least 3 components (data mirror 1, data mirror 2, witness) to satisfy #FTT=1.  Lets just focus on the vmdk object and say that the VM sits on host 1 with mirror components of its vmdk data on host 1 and 2 and the witness component on the virtual Witness VM (host 3).

01 - 2-Node VSAN min

OK, lets start causing some trouble.  With the default # Failures To Tolerate equal 1, VM data on VSAN should be available if a single caching device, a single capacity device, or an entire host fails.  If a single capacity device fails, lets say the one on esxi-02, no problem, another copy of the vmdk is available on esxi-01 and the witness is available on the Witness VM so all is good.  There is no outage, no downtime, VSAN has tolerated 1 failure causing loss of one mirror, and VSAN is doing its job per the defined policy and providing access to the remaining mirror copy of data.  Each object has more that 50% of its components available (one mirror and witness are 2 out of 3 i.e. 66% of the components available) so data will continue to be available unless there is a 2nd failure of either the caching device, capacity device, or esxi-01 host.  The situation is the same if the caching device on esxi-02 fails or the whole host esxi-02 fails. VM data on VSAN would still be available and accessible. If the VM happened to be running on esxi-02 then HA would fail it over to esxi-01 and data would be available. In this configuration, there is no automatic self healing because there’s no where to self heal to. Host esxi-02 would need to be repaired or replaced in order for self healing to kick in and get back to compliance with both mirrors and witness components available.

02 - 2-Node VSAN min

Self healing upon repair

How can we get back to the point where we are able to tolerate another failure?  We must repair or replace the failed caching device, capacity device, or failed host.  Once repaired or replaced, data will resync, and the VSAN Datastore will be back to compliance where it could then tolerate one failure.  With this minimum VSAN configuration, self healing happens only when the failed component is repaired or replaced.

03 - 2-Node VSAN min

2-Node VSAN Self Healing Within Hosts and Across Cluster

To get self healing within hosts and across the hosts in the cluster you must configure your hosts with more disks. Let’s investigate what happens when there are 2 SSD and 4 HDD per host and 4 hosts in a cluster and the policy is set to # Failures To Tolerate equal 1 using the RAID 1 (mirroring) protection method.

01~ - 2-Node VSAN.png

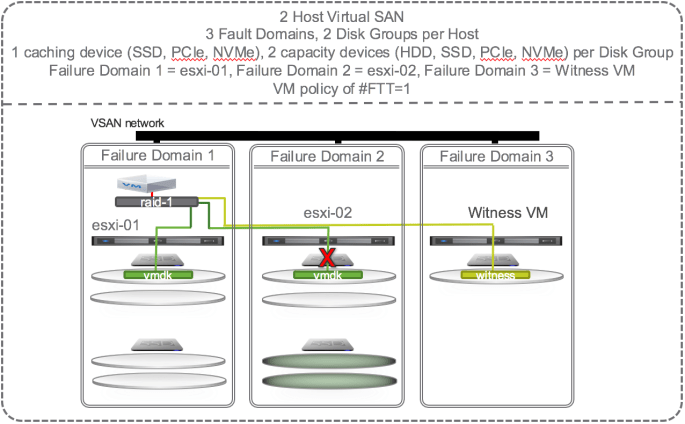
If one of the capacity devices on esxi-02 fails then VSAN could chose to self heal to:

  1. Other disks in the same disk group
  2. Other disks on other disk groups on the same host

The green disks in the diagram below are eligible targets for the new instant mirror copy of the vmdk:

02~ - 2-Node VSAN

This is not an all encompassing and thorough explanation of all the possible scenarios.  There are dependencies on how large the vmdk is, how much spare capacity is available on the disks, and other factors.  But, this should give you a good idea of how failures are tolerated and how self healing can kick in to get back to policy compliance.

Self Healing When SSD Fails

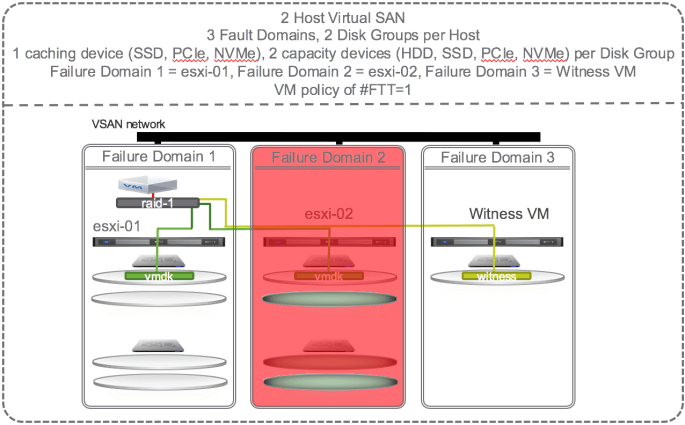
If there is a failure of the caching device on esxi-02 that supports the capacity devices that contain the mirror copy of the vmdk then VSAN could chose to self heal to:

  1. Other disks on other disk groups on the same host
  2. Other disks on other disk groups on other hosts.

The green disks in the diagram below are eligible targets for the new instant mirror of the vmdk:

03~ - 2-Node VSAN.png

Self Healing When a Host Fails

If there is a failure of a host (e.g. esxi-02) that supports mirror of the vmdk then VSAN cannot self heal until the host is repaired or replaced.

04~ - 2-Node VSAN

Summary

VMware Virtual SAN leverages all the disks on all the hosts in the VSAN datastore to self heal.  Note that I’ve only discussed above the self healing behavior of one VM but other VM’s on other hosts may have data on the same failed disk(s) but their mirror may be on different disks in the cluster and VSAN might choose to self heal to other different disks in the cluster.  Thus the self healing workload is a many-to-many operation and thus spread around all the disks in the VSAN datastore.

Self healing is enabled by default, behavior is dependent on the software defined protection policy (#FTT setting), and can occur to disks in the same disk group, to other disk groups on the same host, or to other disks on other hosts. The availability and self healing properties make VSAN a robust storage solution for all data center applications.

VMware Virtual SAN at Storage Field Day 9 (SFD9) – Making Storage Great Again!

On Friday, March 18 I took the opportunity to watch the live Webcast of Storage Field Day 9. If you can carve our some time, I highly recommend this.

Tech Field Day‎@TechFieldDay
VMware Storage Presents at Storage Field Day 9

The panel of industry experts ask all the tough questions and the great VMware Storage team answers them all.

Storage Industry Experts VMware Virtual SAN Experts
  • Alex Galbraith @AlexGalbraith
  • Chris M Evans @ChrisMEvans
  • Dave Henry @DaveMHenry
  • Enrico Signoretti @ESignoretti
  • Howard Marks @DeepStorageNet
  • Justin Warren @JPWarren
  • Mark May @CincyStorage
  • Matthew Leib @MBLeib
  • Richard Arnold @3ParDude
  • Scott D. Lowe @OtherScottLowe
  • Vipin V.K. @VipinVK111
  • W. Curtis Preston @WCPreston
  • Yanbing Le @ybhighheels
  • Christos Karamanolis @XtosK
  • Rawlinson Rivera @PunchingClouds
  • Vahid Fereydouny @vahidfk
  • Gaetan Castelein @gcastelein1
  • Anita Kibunguchy @kibuanita


The ~2 hour presentation was broken up into easily consumable chunks. Here’s a breakdown or the recoded session:

VMware Virtual SAN Overview

In this Introduction, Yanbing Le, Senior Vice President and General Manager, Storage and Availability, discusses VMware’s company success, the state of the storage market, and the success of HCI market leading Virtual SAN in over 3000 customers.

What Is VMware Virtual SAN?

Christos Karamanolis, CTO, Storage and Availability BU, jumps into how Virtual SAN works, answers questions on the use of high endurance and commodity SSD, and how Virtual SAN service levels can be managed through VMware’s common control plane – Storage Policy Based Management.

VMware Virtual SAN 6.2 Features and Enhancements

Christos continues the discussion around VSAN features as they’ve progressed from the 1st generation Virtual SAN released in March 12, 2014 to the 2nd, 3rd, and now 4th generation Virtual SAN that was just released March 16, 2016. The discussion in this section focuses a lot on data protection features like stretched clustering and vSphere Replication. They dove deep into how vSphere Replication can deliver application consistent protection as well as a true 5 minute RPO based on the built in intelligent scheduler sending the data deltas within the 5 minute window, monitoring the SLAs, and alerting if they cannot be met due to network issues.

VMware Virtual SAN Space Efficiency

Deduplication, Compression, Distributed RAID 5 & 6 Erasure Coding are all now available to all flash Virtual SAN configurations. Christos provides the skinny on all these data reduction space efficiency features and how enabling these add very little overhead on the vSphere hosts. Rawlinson chimes on the automated way Virtual SAN can build the cluster of disks and disk groups that deliver the capacity for the shared VSAN datastore. These can certainly be built manually but VMware’s design goal is to make the storage system as automated as possible. The conversation moves to checksum and how Virtual SAN is protecting the integrity of data on disks.

VMware Virtual SAN Performance

OK, this part was incredible! Christos laid down the gauntlet, so to speak. He presented the data behind the testing that shows minimal impact on the hosts when enabling the space efficiency features. Also, he presents performance data for OLTP workloads, VDI, Oracle RACK, etc. All cards on the table here. I can’t begin to summarize, you’ll just need to watch.

VMware Virtual SAN Operational Model

Rawlinson Rivera takes over and does what he does best, throwing all caution to the wind and delivering live demonstrations. He showed the Virtual SAN Health Check and the new Virtual SAN Performance Monitoring and Capacity Management views built into the vSphere Web Client. Towards the end, Howard Marks asked about supporting future Intel NVMe capabilities and Christos’s response was that it’s safe to say VMware is working closely with Intel on ensuring the VMware storage stack can utilize the next generation devices. Virtual SAN already supports the Intel P3700 and P3600 NVMe devices.

This was such a great session I thought I’d promote it and make it easy to check it out. By the way, here’s Rawlinson wearing a special hat!

Make Storage Great Again


How to delete the RAID configuration from drives managed by the Cisco 12G SAS Modular Raid Controller

The content of this blog post was created by a couple of colleagues of mine, David Boone and Bradford Garvey. These guys do a phenomenal job making sure VMware Virtual SAN customers get a great experience with the product by helping them plan, configure, and test VSAN. Because of this, they end up uncovering interesting information like what’s to follow.

Sometimes Cisco UCS hardware intended to be used for VMware Virtual SAN has previously been configured for other uses. In these cases, sometimes a RAID configuration has already been configured on the drives. VSAN requires the individual drives be presented to ESXi either raw via the I/O controller set in Pass-Through Mode (See: How To Configure the Cisco 12G SAS Modular Raid Controller for Pass-Through Mode) or disks set in their own RAID 0 disk groups. Best practice is to set the I/O Controller in Pass-Through Mode (Enable JBOD).  However, if a RAID configuration previously existed, on the Cisco UCS platform there are a few extra steps to complete after enabling JBOD mode for the controller.

If drives were already configured as RAID virtual devices, delete the RAID configuration from the drives.  One way to do that is to Clear the entire VD configuration:

Clear the entire VD configuration

  • Log into the Cisco UCS Manager
  • Open a console to the host
  • Reboot the host
  • On boot up hit Ctrl+R to enter the Cisco 12G SAS Modular Raid Controller BIOS Configuration Utility
  • Hit Ctrl-N until the “VD Mgmt” page is selected
  • In the “VD Mgmt” screen, navigate to the controller, and press the F2 key.
  • Navigate to “Clear Configuration” and press Enter.  You should see this popup:

CiscoUCS - Remove RAID 1

  • Press “Yes” to delete all the virtual drives

Drives will then be in an “Unconfigured Good” state.  They might look something like this:

CiscoUCS - Remove RAID 2

If you see this, these 10 drives are in an “Unconfigured Good” state. They need to be converted to a JBOD state.

There are two options. You can convert a bunch of Unconfigured Good drives to JBOD drives (from the “VD Mgmt” screen) or you can convert a particular Unconfigured Good drive to a JBOD drive (from the “Drive Management” screen)

Option 1: Convert a bunch of Unconfigured Good drives to JBOD drives

Perform the following steps to convert a bunch of Unconfigured Good drives to JBOD drives:

  • In the “VD Mgmt” screen, navigate to the controller and press the F2 key.
  • Navigate to “Make JBOD”, and press Enter.
    The “Convert Unconfigured Good to JBOD” dialog appears, which shows all Unconfigured Good drives in the system.

CiscoUCS - Remove RAID 3


  • Select the Unconfigured Good drives which you want configured as JBODs for VSAN.
    To select or deselect all the Unconfigured Good drives at one go, select the topmost square backets in the “Unconfig good drives” box.
  • Press “OK”.
    The selected Unconfigured Good drives are converted to JBOD drives.

Option 2: Convert a particular Unconfigured Good drive to a JBOD drive

Perform the following steps to convert a particular Unconfigured Good drive to a JBOD drive:

  • In the “Drive Management” screen, navigate to an Unconfigured Good drive, and press the F2 key.
  • Navigate to “Make JBOD”, and press Enter.
  • Press “OK” in the message confirmation box to continue.

After converting all the 10 drives above to JBOD, the screen looks like this:

CiscoUCS - Remove RAID 4

Result

After rebooting, the BIOS will report all 10 drives and ESXi will see all of them in a JBOD (Pass-Through) configuration, with all the benefits of JBOD like being able to retrieve S.M.A.R.T.S. info from the physical drives.

The information obtained to create this post was gathered from the Avago – 12Gb/s MegaRAID® SAS Software – User Guide

Thanks again to David Boone and Bradford Garvey for providing this information.

How To Configure the Cisco 12G SAS Modular Raid Controller for Pass-Through Mode

Yesterday I was at the New England VTUG event which is always a great event to meet up with familiar faces and be introduced to some new ones. I met up with a relatively new VMware Virtual SAN customer and we discussed lots of fun things about VSAN and their implementation experience. One frustrating thing they mentioned is that they couldn’t find anywhere that documented how to put the Cisco 12G SAS Modular Raid Controller in Pass-Through mode. They explained that after lots of searching on VMware and Cisco’s site, they contacted Cisco and were provided the information. They were kind enough to capture a screenshot of the setting and provide it to me.

The procedure is:

  • Log into the Cisco UCS Manager
  • Open a console to the host
  • Reboot the host
  • On boot up hit Ctrl+R to enter the Cisco 12G SAS Modular Raid Controller BIOS Configuration Utility
  • Hit Ctrl-N until the “Ctrl Mgmt” page is selected
  • In the bottom right hand corner, make sure the “Enable JBOD” field shows an X per the screen shot below.
  • Hit Ctrl-S to save Reboot

Cisco 12G SAS Enable JBOD

That’s it. Easy.

If this is a brand new, unconfigured host, the unclaimed disks in the host will now get passed to ESXi and VSAN can use them for the VSAN datastore.

However, if this host IO Controller had previously been configured with RAID, you should check out: How to delete the RAID configuration from drives managed by the Cisco 12G SAS Modular Raid Controller

I hope that helps others save some time in getting VSAN up and running.

Special thanks to Stephanie Forde and Matthew Gabrick from the Boston Water and Sewer Commission for pointing this out and providing the screenshot.

Queue Depth and the FBWC Controller Cache module on the Cisco 12G SAS Modular Raid Controller for Virtual SAN

If you scan the bill of materials for the various Cisco UCS VSAN ReadyNodes you’ll see a line item for:

Controller Cache: Cisco 12Gbps SAS 1GB FBWC Cache module (Raid 0/1/5/6)

If you’ve followed Virtual SAN for awhile you might wonder, why would the ReadyNodes include controller cache when VMware recommends disabling controller cache when implementing Virtual SAN. Well, it turns out that the presence of the FBWC Cache module allows the queue depth of the Cisco 12G SAS Modular Raid Controller to go from the low 200’s to the advertised 895. The minimum queue depth requirement for Virtual SAN is 256 so including the FBWC Cache module allows the queue depth to increase above that minimum requirement and improve Virtual SAN performance.

Steps to Implement the Correct I/O Controller Driver for the Cisco 12G SAS Modular Raid Controller for Virtual SAN

This is my third post this week, possibly a record for me. All three are centered around ensuring the correct firmware and drivers are installed and running. The content of this post was created by my colleague, David Boone, who works with VMware customers to ensure successful Virtual SAN deployments. When it comes to VSAN, its important to use qualified hardware but equally important to make sure the correct firmware and drivers are installed.

Download the Correct I/O Controller Driver

Navigate to the VMware Compatibility Guide for Virtual SAN, scroll down and select “Build Your Own based on Certified Components”, then find the controller in the database. Here’s the link for the Cisco 12G SAS Modular Raid Controller and the link to download the correct driver for it (as of Nov. 20, 2015): https://my.vmware.com/web/vmware/details?downloadGroup=DT-ESX55-LSI-SCSI-MEGARAID-SAS-660606001VMW&productId=353

Install the Correct Driver

Use your favorite way to install the driver. This might include creating a custom vSphere install image to deploy on multiple hosts, rolling out via vSphere Update Manager (VUM), or manually installing on each host.

Continue reading “Steps to Implement the Correct I/O Controller Driver for the Cisco 12G SAS Modular Raid Controller for Virtual SAN”

2 Node Virtual SAN (ROBO VSAN) Deployment

I’ve been asked a few times over the last few weeks for deployment guides or white papers for 2 Node Virtual SAN, typically used to support remote offices (ROBO VSAN). VMware currently doesn’t have specific documentation that I can find but it’s essentially the same process as building a stretched cluster, which is documented in the Administering VMware Virtual SAN guide and the Virtual SAN Stretched Clustering Guide. The difference is that with 2 node VSAN, the two fault domains only have 1 node each and are located in the same site.  We expect the witness VM to be installed on a host back in the primary data center.  The latency of the WAN link back to the primary data center can be up to 500ms and the bandwidth must be a minimum of 1.5Mbps.

In the Administering VMware Virtual SAN guide, we detail how to build a stretched cluster starting on page 51.

http://pubs.vmware.com/vsphere-60/topic/com.vmware.ICbase/PDF/virtual-san-61-administration-guide.pdf

So, basically follow these steps, create two fault domains with 1 host in each and locate them on the same site.  Then deploy the Witness VM back in the production data center. The networking requirements are less complicated since you don’t have to worry about using a Layer 2 stretched or a Layer 3 network between data sites. VSAN supports a Layer 3 network between the ROBO sites and the witness host site.

vsan-robo-wit

Here are a few other helpful blog posts on 2 Node VSAN (ROBO VSAN):

VMware Virtual SAN ROBO Edition

VMware Virtual SAN Cluster ROBO Edition: Configuration Demonstration

2 is the minimum number of hosts for VSAN if you ask me

Virtual SAN Licensing And Packaging For Virtual SAN 6.1

2 Node Virtual SAN and Virtual SAN for ROBO Licensing

At VMworld 2015, VMware announced many new enhancements to Virtual SAN. One of which is that VSAN can now deliver highly available storage with just 2 physical nodes. This is known as 2 Node VSAN. Previously, to achieve redundancy for high availability, VSAN required 3 physical nodes.  Here’s a nice post on this:

2 is the minimum number of hosts for VSAN if you ask me

At VMworld 2015, VMware also announced support for Virtual SAN for ROBO (Remote Office Branch Office) licensing to align with vSphere ROBO licensing. Like vSphere ROBO, VSAN for ROBO is sold in packs of 25 VMs that can be distributed across multiple sites. The great thing about this model is if you have 5 sites with each running 5 VM’s, you can purchase one 25 VM ROBO pack to support the 25 VM’s across the 5 sites. One limitation is that you cannot deploy a ROBO license on a site that will run more than 25 VMs.

There can be a bit of confusion between the deployment model and the license model because the 2 Node VSAN (which is often referred to as ROBO VSAN) and the VSAN for ROBO licensing are mutually exclusive. In other words, you can deploy a 2 Node vSphere cluster but apply VSAN Standard or VSAN Advanced licensing to enable VSAN on it. And, you can deploy a 3, 8, 17, or 64 node vSphere cluster and apply VSAN for ROBO licensing to enable VSAN on it. However, we expect that if you are deploying a 2 node vSphere cluster with VSAN enabled, you will likely apply a vSphere for ROBO and VSAN for ROBO license. I point this out because you may want to only deploy 2 nodes but want to run 50 VM’s. This is perfectly fine but would require VSAN Standard or VSAN Advanced licensing.

This post may further enhance what I’ve discussed:

Virtual SAN Licensing And Packaging For Virtual SAN 6.1

What Makes VSAN Different?

I had a question today asking how VMware Virtual SAN (VSAN) compares to XYZ company. There are over a dozen virtual machine software based solutions that leverage the local disks in ESXi hosts to present storage back to the hosts in the vSphere cluster. Those solutions require a vSphere cluster to be created then their virtual machine must be installed on every host to handle the storage services. Some are more efficient at this than others but there is always level of effort to “build-your-own” storage on top of the vSphere cluster and those virtual machines can take up significant host resources to deliver on the storage services they offer. So converged infrastructure itself is nothing new or unique. Its how it’s done that is important.

Here’s what makes VMware Virtual SAN (VSAN) different:

  • VSAN is the ONLY software defined storage solution that is embedded into the ESXi hypervisor making it the most efficient data path for performance.  VM’s send their data through the hypervisor right to disk, there’s no middle man.  In addition, VSAN is the most efficient in its use of the host resources to deliver on the storage service. VSAN is designed to take up no more than 10% of the host CPU and memory resources and testing with vSphere 6 show significantly less impact than that. Since VSAN is not a VM on top of the hypervisor, it has this distinct advantage. This was a positive tradeoff for the fact that VSAN is a VMware vSphere only solution.
  • Being built in also makes it simple and easy to manage. There is no VSAN install, it is simply enabled as a feature of the hypervisor by clicking a check box. When enabled, VSAN will collect all the local disks on all the hosts and create the VSAN Datastore. Bear in mind, the server IO controller and disks must be in place and networking configurations must be completed to make sure VSAN will work when you click that check box.

VSAN Checkbox

  • VSAN is fully integrated into VMware Storage Policy Based Management (SPBM), VASA, and VVOLs. When that check box is clicked, the VSAN datastore is created and it’s VASA provider is registered with vCenter to expose it’s capabilities to SPBM. This allows different policy to be created so the same pool of capacity can deliver different service levels to different VM’s based on performance, availability, and protection. When VM’s are attached to a policy service level, their VM objects get created on the VSAN datastore in the form of Virtual Volume (VVOL) objects. VSAN further breaks these VVOL objects up into components to deliver on the defined protection and performance service levels.

VSAN and SPBM

  • VSAN deals with data protection at the software layer so it doesn’t suffer the performance and capacity penalty of hardware RAID. Different “tiers” of protection can be defined by policy and set for different VM’s using the same pool of disks in the VSAN datastore.  Numbers of Failures to Tolerate settings determine how many data replicas are written to different hosts to deliver the desired protection level for VM’s.
  • VSAN now supports a feature called “Rack Diversity”.  I wrote about the benefits here.  This brings Software Defined Self Healing with Failure Domains.  Hosts in the same rack can be placed into the same fault domain so that if an entire rack is lost then data remains available since another replica copy of the data resides on another host in another rack.

VSAN Rack Diversity

  • VSAN is a hybrid storage solution leveraging SSD as cache to accelerate both reads and writes and low cost high capacity hard disks to persist the data. This results in near All-Flash array performance at a fraction of the cost. With vSphere 6 along with Virtual SAN 6, an All-Flash VSAN is supported delivering extreme performance.

VMware Virtual SAN™ 6.0 Performance

  • VSAN is one of the few software based storage solutions that can leverage the in host SSD/Flash for Read AND Write caching. There are many solutions that can leverage in host SSD/Flash for read caching. Write back caching is more difficult to implement but VSAN does it while maintaining high availability of those writes across the cluster.

All other converged software based storage solutions require running a Virtual Machine on top of ESXi. So all VM’s have to go through their own IO path, through the hypervisor, then through that single VM IO path, then back through the hypervisor, then to the disks. In some cases, the disks themselves need to be setup with a hardware RAID configuration then their VM solution implements software RAID in addition to the underlying hardware RAID paying a double performance and capacity penalty. Each of these VM’s take on additional host CPU and Memory. Some require 2-4 vCPU’s and 16GB or more of RAM. And some are limited to the number of nodes they can scale to and how much total capacity can be supported. Again, some solutions are more efficient and scalable than others so do the homework and ask the right questions when comparing. Finally, most don’t support VMware’s Storage Policy Based Management which is the VMware framework for managing all vSphere storage going forward.

VMware’s vision for Virtual SAN is that it be the best storage solution for Virtual Machines. With the release of vSphere 6 and Virtual SAN 6, VMware is closer to that vision. There are many software defined storage choices out there.  Hopefully this helps in that decision making process.

Virtual SAN 6 – What Does a Maxed Out 64 Host VSAN Cluster Look Like?

The big VMware vSphere 6 launch was yesterday and along with it comes Virtual SAN (VSAN) 6. Here are a couple of good summaries:

Rawlinson Rivera – VMware Virtual SAN 6.0

What’s New: VMware Virtual SAN 6.0

The big news is that a vSphere cluster will now scale to 64 hosts and thus VSAN will too. So what does that look like fully scaled up and out with the maximum hosts, maximum disk groups, and maximum disks per disk group? By the way, for details on how VSAN scales up and out check Is Virtual SAN (VSAN) Scale Up or Scale Out Storage…, Yes!.

Virtual SAN (VSAN) Enabled vSphere Cluster Scaled Up and Out to 64 hosts (nodes).

64 host VSAN

Oh yea, the overall VSAN performance is significantly improved. Plus with double the number of hosts that doubles the performance. In addition, VSAN now supports an All-Flash configuration that even further increases the performance.