How to delete the RAID configuration from drives managed by the Cisco 12G SAS Modular Raid Controller

The content of this blog post was created by a couple of colleagues of mine, David Boone and Bradford Garvey. These guys do a phenomenal job making sure VMware Virtual SAN customers get a great experience with the product by helping them plan, configure, and test VSAN. Because of this, they end up uncovering interesting information like what’s to follow.

Sometimes Cisco UCS hardware intended to be used for VMware Virtual SAN has previously been configured for other uses. In these cases, sometimes a RAID configuration has already been configured on the drives. VSAN requires the individual drives be presented to ESXi either raw via the I/O controller set in Pass-Through Mode (See: How To Configure the Cisco 12G SAS Modular Raid Controller for Pass-Through Mode) or disks set in their own RAID 0 disk groups. Best practice is to set the I/O Controller in Pass-Through Mode (Enable JBOD).  However, if a RAID configuration previously existed, on the Cisco UCS platform there are a few extra steps to complete after enabling JBOD mode for the controller.

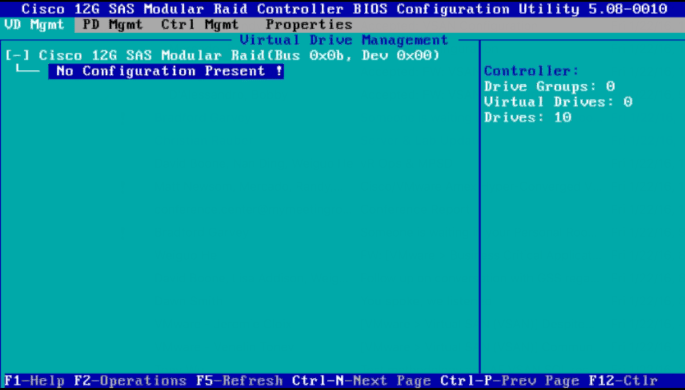
If drives were already configured as RAID virtual devices, delete the RAID configuration from the drives.  One way to do that is to Clear the entire VD configuration:

Clear the entire VD configuration

  • Log into the Cisco UCS Manager
  • Open a console to the host
  • Reboot the host
  • On boot up hit Ctrl+R to enter the Cisco 12G SAS Modular Raid Controller BIOS Configuration Utility
  • Hit Ctrl-N until the “VD Mgmt” page is selected
  • In the “VD Mgmt” screen, navigate to the controller, and press the F2 key.
  • Navigate to “Clear Configuration” and press Enter.  You should see this popup:

CiscoUCS - Remove RAID 1

  • Press “Yes” to delete all the virtual drives

Drives will then be in an “Unconfigured Good” state.  They might look something like this:

CiscoUCS - Remove RAID 2

If you see this, these 10 drives are in an “Unconfigured Good” state. They need to be converted to a JBOD state.

There are two options. You can convert a bunch of Unconfigured Good drives to JBOD drives (from the “VD Mgmt” screen) or you can convert a particular Unconfigured Good drive to a JBOD drive (from the “Drive Management” screen)

Option 1: Convert a bunch of Unconfigured Good drives to JBOD drives

Perform the following steps to convert a bunch of Unconfigured Good drives to JBOD drives:

  • In the “VD Mgmt” screen, navigate to the controller and press the F2 key.
  • Navigate to “Make JBOD”, and press Enter.
    The “Convert Unconfigured Good to JBOD” dialog appears, which shows all Unconfigured Good drives in the system.

CiscoUCS - Remove RAID 3


  • Select the Unconfigured Good drives which you want configured as JBODs for VSAN.
    To select or deselect all the Unconfigured Good drives at one go, select the topmost square backets in the “Unconfig good drives” box.
  • Press “OK”.
    The selected Unconfigured Good drives are converted to JBOD drives.

Option 2: Convert a particular Unconfigured Good drive to a JBOD drive

Perform the following steps to convert a particular Unconfigured Good drive to a JBOD drive:

  • In the “Drive Management” screen, navigate to an Unconfigured Good drive, and press the F2 key.
  • Navigate to “Make JBOD”, and press Enter.
  • Press “OK” in the message confirmation box to continue.

After converting all the 10 drives above to JBOD, the screen looks like this:

CiscoUCS - Remove RAID 4

Result

After rebooting, the BIOS will report all 10 drives and ESXi will see all of them in a JBOD (Pass-Through) configuration, with all the benefits of JBOD like being able to retrieve S.M.A.R.T.S. info from the physical drives.

The information obtained to create this post was gathered from the Avago – 12Gb/s MegaRAID® SAS Software – User Guide

Thanks again to David Boone and Bradford Garvey for providing this information.

How To Configure the Cisco 12G SAS Modular Raid Controller for Pass-Through Mode

Yesterday I was at the New England VTUG event which is always a great event to meet up with familiar faces and be introduced to some new ones. I met up with a relatively new VMware Virtual SAN customer and we discussed lots of fun things about VSAN and their implementation experience. One frustrating thing they mentioned is that they couldn’t find anywhere that documented how to put the Cisco 12G SAS Modular Raid Controller in Pass-Through mode. They explained that after lots of searching on VMware and Cisco’s site, they contacted Cisco and were provided the information. They were kind enough to capture a screenshot of the setting and provide it to me.

The procedure is:

  • Log into the Cisco UCS Manager
  • Open a console to the host
  • Reboot the host
  • On boot up hit Ctrl+R to enter the Cisco 12G SAS Modular Raid Controller BIOS Configuration Utility
  • Hit Ctrl-N until the “Ctrl Mgmt” page is selected
  • In the bottom right hand corner, make sure the “Enable JBOD” field shows an X per the screen shot below.
  • Hit Ctrl-S to save Reboot

Cisco 12G SAS Enable JBOD

That’s it. Easy.

If this is a brand new, unconfigured host, the unclaimed disks in the host will now get passed to ESXi and VSAN can use them for the VSAN datastore.

However, if this host IO Controller had previously been configured with RAID, you should check out: How to delete the RAID configuration from drives managed by the Cisco 12G SAS Modular Raid Controller

I hope that helps others save some time in getting VSAN up and running.

Special thanks to Stephanie Forde and Matthew Gabrick from the Boston Water and Sewer Commission for pointing this out and providing the screenshot.

Queue Depth and the FBWC Controller Cache module on the Cisco 12G SAS Modular Raid Controller for Virtual SAN

If you scan the bill of materials for the various Cisco UCS VSAN ReadyNodes you’ll see a line item for:

Controller Cache: Cisco 12Gbps SAS 1GB FBWC Cache module (Raid 0/1/5/6)

If you’ve followed Virtual SAN for awhile you might wonder, why would the ReadyNodes include controller cache when VMware recommends disabling controller cache when implementing Virtual SAN. Well, it turns out that the presence of the FBWC Cache module allows the queue depth of the Cisco 12G SAS Modular Raid Controller to go from the low 200’s to the advertised 895. The minimum queue depth requirement for Virtual SAN is 256 so including the FBWC Cache module allows the queue depth to increase above that minimum requirement and improve Virtual SAN performance.

Steps to Implement the Correct I/O Controller Driver for the Cisco 12G SAS Modular Raid Controller for Virtual SAN

This is my third post this week, possibly a record for me. All three are centered around ensuring the correct firmware and drivers are installed and running. The content of this post was created by my colleague, David Boone, who works with VMware customers to ensure successful Virtual SAN deployments. When it comes to VSAN, its important to use qualified hardware but equally important to make sure the correct firmware and drivers are installed.

Download the Correct I/O Controller Driver

Navigate to the VMware Compatibility Guide for Virtual SAN, scroll down and select “Build Your Own based on Certified Components”, then find the controller in the database. Here’s the link for the Cisco 12G SAS Modular Raid Controller and the link to download the correct driver for it (as of Nov. 20, 2015): https://my.vmware.com/web/vmware/details?downloadGroup=DT-ESX55-LSI-SCSI-MEGARAID-SAS-660606001VMW&productId=353

Install the Correct Driver

Use your favorite way to install the driver. This might include creating a custom vSphere install image to deploy on multiple hosts, rolling out via vSphere Update Manager (VUM), or manually installing on each host.

Continue reading “Steps to Implement the Correct I/O Controller Driver for the Cisco 12G SAS Modular Raid Controller for Virtual SAN”

What if the SSD and HDD Firmware Versions are Newer Than What is Listed on the VMware Compatibility Guide (VCG) for Virtual SAN?

No problem, this is OK.

If you want to know more detail, keep reading…

Last week I was working with a customer to implement a VSAN ReadyNode. Before enabling VSAN on a cluster it’s a best practice to validate that the firmware of the host I/O Controller, SSD’s (SAS, SATA, PCIe, NVMe, or UltraDIMM), and HDD’s (SAS, NL-SAS, or SATA) are up to the required versions. Each hardware vendor has a different way of doing this.

In reviewing this particular customers hardware, we found that the SSD and HDD Firmware Versions were newer than what is listed on the VCG.

Note that for SSD’s and HDD’s, the hardware vendors provides the VMware Virtual SAN team with the firmware version they tested and qualified for VSAN. VMware then lists that firmware version for that model of disk on the VMware Compatibility Guide (VCG) for Virtual SAN. If the hardware vendor comes out with “new firmware” then it does not require VSAN re-certification of the SSD or HDD. VMware supports disks with “newer firmware” for Virtual SAN but VMware leaves the VCG alone and continues listing the “old firmware”. However, if the hardware vendor wants VMware to remove the “old firmware” from the VCG listing and replace it with the “new firmware” VMware would do that upon their request. This would typically happen if the hardware vendor discovers an issue/bug with the “old firmware”.

I hope this helps clarify how VMware treats SSD and HDD Firmware Version listings on the VMware Compatibility Guide for Virtual SAN.

Verifying the Correct Version of the Cisco UCS C240 Server I/O Controller Firmware – Cisco 12G SAS Modular Raid Controller

Today I was working with Cisco to setup UCS C240 servers for Virtual SAN. As part of the process we needed to verify the Cisco 12G SAS Modular Raid Controller had the correct Firmware Version.

First we went to the VMware Compatibility Guide for Virtual SAN, navigated to the bottom of the page to the link for Build Your Own based on Certified Components. Under “Search For:” we selected “I/O Controller” and under “Brand Name:” we selected “Cisco” and found the listing for the Cisco 12G SAS Modular Raid Controller. It requires Firmware Version 4.270.00-4238.

vcg-Cisco 12G

Next we went into the Cisco UCS Manager and navigated to the Host Firmware Packages and found that the Storage Controller Firmware Package was 24.7.0-0047.

CiscoUCS1

Through UCS Manager there is no way to get the I/O Controller Firmware Version. So, we had to reboot the host and hit “CTRL-R” to get into the Cisco 12G SAS Modular Raid Controller Bios Configuration Utility.

CiscoUCS2

From here we hit CTRL-N to get into Properties.

CiscoUCS3

On this screen you can see:

Package: 24.7.0-0047

FW Version: 4.270.00-4238

Thus, we were able to confirm that we had the correct Firmware on the I/O Controller. If the FW Version was different than what VMware Virtual SAN supports, you would need to download the correct Firmware Package from Cisco and upgrade.

I hope this helps others save time trying to verify Firmware Versions. Thanks to my VMware Virtual SAN colleague, David Boone, who did most of the work that led to this post and our friends at Cisco for being a great partner and helping navigate UCS Manager and grabbing screenshots.

2 Node Virtual SAN (ROBO VSAN) Deployment

I’ve been asked a few times over the last few weeks for deployment guides or white papers for 2 Node Virtual SAN, typically used to support remote offices (ROBO VSAN). VMware currently doesn’t have specific documentation that I can find but it’s essentially the same process as building a stretched cluster, which is documented in the Administering VMware Virtual SAN guide and the Virtual SAN Stretched Clustering Guide. The difference is that with 2 node VSAN, the two fault domains only have 1 node each and are located in the same site.  We expect the witness VM to be installed on a host back in the primary data center.  The latency of the WAN link back to the primary data center can be up to 500ms and the bandwidth must be a minimum of 1.5Mbps.

In the Administering VMware Virtual SAN guide, we detail how to build a stretched cluster starting on page 51.

http://pubs.vmware.com/vsphere-60/topic/com.vmware.ICbase/PDF/virtual-san-61-administration-guide.pdf

So, basically follow these steps, create two fault domains with 1 host in each and locate them on the same site.  Then deploy the Witness VM back in the production data center. The networking requirements are less complicated since you don’t have to worry about using a Layer 2 stretched or a Layer 3 network between data sites. VSAN supports a Layer 3 network between the ROBO sites and the witness host site.

vsan-robo-wit

Here are a few other helpful blog posts on 2 Node VSAN (ROBO VSAN):

VMware Virtual SAN ROBO Edition

VMware Virtual SAN Cluster ROBO Edition: Configuration Demonstration

2 is the minimum number of hosts for VSAN if you ask me

Virtual SAN Licensing And Packaging For Virtual SAN 6.1

2 Node Virtual SAN and Virtual SAN for ROBO Licensing

At VMworld 2015, VMware announced many new enhancements to Virtual SAN. One of which is that VSAN can now deliver highly available storage with just 2 physical nodes. This is known as 2 Node VSAN. Previously, to achieve redundancy for high availability, VSAN required 3 physical nodes.  Here’s a nice post on this:

2 is the minimum number of hosts for VSAN if you ask me

At VMworld 2015, VMware also announced support for Virtual SAN for ROBO (Remote Office Branch Office) licensing to align with vSphere ROBO licensing. Like vSphere ROBO, VSAN for ROBO is sold in packs of 25 VMs that can be distributed across multiple sites. The great thing about this model is if you have 5 sites with each running 5 VM’s, you can purchase one 25 VM ROBO pack to support the 25 VM’s across the 5 sites. One limitation is that you cannot deploy a ROBO license on a site that will run more than 25 VMs.

There can be a bit of confusion between the deployment model and the license model because the 2 Node VSAN (which is often referred to as ROBO VSAN) and the VSAN for ROBO licensing are mutually exclusive. In other words, you can deploy a 2 Node vSphere cluster but apply VSAN Standard or VSAN Advanced licensing to enable VSAN on it. And, you can deploy a 3, 8, 17, or 64 node vSphere cluster and apply VSAN for ROBO licensing to enable VSAN on it. However, we expect that if you are deploying a 2 node vSphere cluster with VSAN enabled, you will likely apply a vSphere for ROBO and VSAN for ROBO license. I point this out because you may want to only deploy 2 nodes but want to run 50 VM’s. This is perfectly fine but would require VSAN Standard or VSAN Advanced licensing.

This post may further enhance what I’ve discussed:

Virtual SAN Licensing And Packaging For Virtual SAN 6.1

Virtual SAN and Data-At-Rest Encryption

There are many reasons you might want to encrypt your data at rest.  This post will not discuss those reasons, but simply offer options on how to do it with Virtual SAN.  It should be noted that VMware takes customer feedback seriously and several customers have been asking for encryption to be built-in to VSAN. This is being appropriately considered and that’s about all I can say about that for now. As of Dec 2016, this is available in the latest vSAN Beta.

So what can customers do right now to solve their Data-At-Rest Encryption requirements for data residing on a Virtual SAN datastore? Here are 3 options.

  1. VM Based Encryption
    1. Third Parties
    2. VM Encryption
  2. vSAN Encryption (Coming Soon)
  3. Self Encrypting Drives (SED’s)
  4. Controller Based Key Management + Self Encrypting Drives (SED’s)

NOTE: The vSAN team tested SED’s and determined that they do not provide an acceptable solution. So, the only supported Encryption options are software based through third parties, using VM Encryption, or the upcoming vSAN Encryption. 

VM Based Encryption

The beauty of a VM based encryption solution is it works to protect any VM and its data sitting on any storage. This solution approach will work with VM’s on Virtual SAN but also with VM’s on any other datastore backed by any storage system (e.g. EMC, NetApp, HP, Dell, etc.) via any connectivity (e.g. Fibre Channel, iSCSI, NFS). Here are some options:

VM Based Encryption

At VMworld 2016 in Las Vegas, VMware announced the upcoming vSAN Beta. For more details see:
Virtual SAN Beta – Register Today!
https://blogs.vmware.com/virtualblocks/2016/09/07/virtual-san-beta-register-today/

This vSAN Beta includes vSAN encryption targeted for a future release of vSphere. vSAN Encryption will satisfy data-at-rest encryption.

You might ask why vSAN Encryption would be necessary if vSphere has VM Encryption? Check out this
The difference between VM Encryption in vSphere 6.5 and vSAN encryption
http://www.yellow-bricks.com/2016/11/07/the-difference-between-vm-encryption-in-vsphere-6-5-and-vsan-encryption/

Self Encrypting Drives (SED’s)

Self Encrypting Drives (SED’s) are just what they say they are. When blocks are ingested into these drives, the firmware on the drives will encrypt the data and complete the write. When blocks are read back, the firmware decrypts the data and sends it back. This is valuable in the case that if a drive goes missing, the data on it is encrypted. Here are a few details on how they work:

  • The encryption key used in SEDs is called the Media Encryption Key (MEK)
  • Locking and unlocking a drive requires another key, called the Key Encryption Key (KEK)
  • If no KEK is set, the drive is always unlocked and appears not to be encrypting even though it is
  • If a KEK is set, the drive will power up locked until the correct KEK is given to the drive by the user.

When used with Virtual SAN, these drives simply work without Virtual SAN even knowing encryption is going on and all the things that hold true for standard drives would hold true when using these SEDs. Like standard drives, if a host fails, you could pull the SED’s and move to a different host or a new host in the same cluster and the data would be intact. Like standard drives, the SEDs could not be moved and read by hosts in a different cluster.

SED’s have minimal impact to I/O latency since the encryption work is distributed across all the drives. There are SED HDD’s and SED SSD’s offered by different manufacturers and some will be qualified and made available on the VMware Compatibility Guide (VCG) for Virtual SAN.

http://www.vmware.com/resources/compatibility/search.php?deviceCategory=vsan

Controller Based Key Management + Self Encrypting Drives (SED’s)

Some customers want to introduce encryption keys and a centralized way to manage the keys so that they have greater control over the Self Encrypting Drives.

LSI (Avago) has a technology built into their IO controller cards called SafeStore that has built in key generation software that can be used in conjunction with the SEDs.

LSI™ MegaRAID® SafeStore™ Software FAQ

https://www.lsi.com/downloads/Public/Advanced%20Software/LSI%20MegaRAID%20SafeStore%20Software/MR_SafeStore_FAQ_042110.pdf

SafeStore essentially locks the drive and it cannot be powered on or moved to a new or another host in the cluster without using the SafeStore key to unlock it first. There would be one LSI SafeStore key for every LSI controller. SafeStore keys can be managed by 3rd party key management software (e.g. RSA, SafeNet, etc.). If a host fails but the drives are still good simply pull the drives out and put them in a new host. On power up they will be locked, so you’ll need to unlock them.

LSI IO Controllers that adhere to the SafeStore standard will be publish on the VMware Compatibility Guide for Virtual SAN.

Summary

VMware has a few options for Data-At-Rest encryption with Virtual SAN. Each have their own pros and cons so customers can weigh the odds and make the appropriate decision.

VMworld 2015 Keynote – Storage and Availability

I watched the streaming video of the VMworld 2015 Keynote this morning and there were plenty of highlights. In my mind and many others, Yanbing Li stole the show. Not only did she provide new and impressive announcements, she was funny too. And, she comes from the Storage and Availability Business Unit.

The Keynote began with somewhat cute application mascots escorting Carl Eschenbach on stage. Apps are the important, but, they have to run somewhere,… on infrastructure. Yanbing’s first message was that VMware is constantly working to Simplify infrastructure, which makes sense. Lets make infrastructure as simple as possible so that the focus can be put on the important things, the applications.

Simplify Extend Reach

Yanbing discussed VMware’s infrastructure foundation being vSphere 6 for compute, NSX 6.2 for network, and for storage she stated “my personal favorite storage platform, Virtual SAN” 6.1. Of course there are lots of other storage choices out there and VASA, VVols, and SPBM aims to simplify the management of those, but if you are looking to build the simplest possibly physical infrastructure then Virtual SAN makes storage a simple extension of the capabilities of the vSphere cluster. Here’s more on “What is new for Virtual SAN 6.1?”.

Once the infrastructure is up and running, vRealize Suite simplifies management of it and the deployment of VM’s. All this infrastructure software has to run on hardware, and that hardware can be a challenge to setup. So, the big announcement is how EVO SDDC Manager will simplify the deployment of physical infrastructure. The same simplification benefits that EVO:RAIL brought will be extended to whole racks of hardware. Each rack will support 1000 VM’s or 2000 VDI’s and provide up to 2M IOPS of storage performance. Using the EVO SDDC Manager, multiple racks can be combined to create a virtual rack that can be divided up into workload domains. These workload domains can be secured with NSX for multi-tenancy protection. In addition, EVO SDDC Manager will provide Non-disruptive LifeCycle Automation to take care of infrastructure and software updates, just like EVO:RAIL does today. Pretty cool. I’m looking forward to seeing this in action.

Next, Yanbing discussed how to Extend your datacenter. Basically, what new things can be done to federate hybrid clouds (between your own datacenters or your datacenter and a public cloud). The first thing discussed was something called Content Library Automatic Synchronization and Yanbing demonstrated syncing VM templates between datacenters or vCloud Air. This is great, but to move live workloads, VMware introduced vCloud Air Hybrid Network Services to enable vMotion between hybrid clouds. Side note, I was part of a project that demonstrated an alpha version of something like this at EMC World a few years back, but, back then we didn’t have NSX. Last year, VMware announced long distance vMotion between customer data centers. But this year, in Yanbing’s words, “we have just witnessed history, cross-cloud vMotion”. Makes you think back to the first time you witnessed the original vMotion.

Finally, Yanbing discussed the benefits of Reach and vCloud Air’s capabilities. Disaster Recovery and Backup Services have been available for awhile to protect critical workloads. But now VMware announces availability of vCloud Air Object Storage as a service which is powered by EMC’s Elastic Cloud Storage.  This is great news for customers as object storage becomes more and more of a requirement and one that can now be satisfied by expanding capabilities of VMware’s Storage and Availability Business Unit and vCloud Air.

There was more to the Keynote presentation but I chose to just focus this post on the Storage and Availability announcements and Yanbing’s presentation. As she walked off stage she yelled “Go VSAN!”… Awesome!

Yanbing Li